

결제 취소 기능에 대해 포스팅하기 앞서 iamport를 사용하기 위한 준비과정 및 결제 기능 구현하는 방법에 대해서는 아래 포스팅에 설명되어 있다.
[Spring] 아임포트(import)로 결제 기능 구현하기 (클라이언트 + 서버 코드 포함)
import 란? 아임포트는 쇼핑몰 서버를 대신해서 쇼핑몰에서 사용자가 상품을 구매하려 할 때 실제 결제 요청 받는 역할을 하고 이 요청을 받아서 PG(결제 대행 업체)에 요청을 해준다. 그리고 결제
hstory0208.tistory.com
결제 취소 기능 구현
상품을 결제했으면 당연히 취소도 가능해야한다.
그렇기 때문에 결제 취소 로직을 추가하였다.
아래에서 설명하는 iamport에 결제 취소 요청을 보내는 코드를 구현하면 결제 완료된 상품에 대한 상품에 대한 결제 취소는 물론, 결제 진행 중 오류가 발생하면 자동으로 결제 취소하도록 할 수 있다.
포스팅하는 코드들에 대해 먼저 설명하자면 결제 진행 중 예외가 발생하면 자동으로 결제를 취소하도록 하였다.
이 예외는 재고 수량이 부족할 경우에 발생하도록 하였다.
물론 장바구니, 상품 상세 페이지에서 남은 상품의 재고보다 많은 수량을 구매하려 하면 상품을 구매하지 못하도록 막아 놨지만
만약 상품의 재고가 15개이고 두명의 구매자가 동시에 각각 7개 , 10개를 구매할 경우에 동시성 문제로 남은 재고가 없음에도 불구하고 결제가 되는 상황이 생길 수 있기 때문에 이러한 로직을 추가하게 되었다.
PaymentController
@Controller
@Slf4j
@RequiredArgsConstructor
public class PaymentController {
    private final PaymentService paymentService;
    private final RefundService refundService;

    private IamportClient iamportClient;

    @Value("${imp.api.key}")
    private String apiKey;

    @Value("${imp.api.secretkey}")
    private String secretKey;

    @PostConstruct
    public void init() {
        this.iamportClient = new IamportClient(apiKey, secretKey);
    }

    @PostMapping("/order/payment")
    public ResponseEntity<String> paymentComplete(@Login SessionUser sessionUser, @RequestBody List<OrderSaveDto> orderSaveDtos) throws IOException {
        String orderNumber = String.valueOf(orderSaveDtos.get(0).getOrderNumber());
        try {
            Long userId = sessionUser.getUserIdNo();
            paymentService.saveOrder(userId, orderSaveDtos);
            log.info("결제 성공 : 주문 번호 {}", orderNumber);
            return ResponseEntity.ok().build();
        } catch (RuntimeException e) {
            log.info("주문 상품 환불 진행 : 주문 번호 {}", orderNumber);
            String token = refundService.getToken(apiKey, secretKey);
            refundService.refundWithToken(token, orderNumber, e.getMessage());
            return new ResponseEntity<>(e.getMessage(), HttpStatus.BAD_REQUEST);
        }
    }

    @PostMapping("/payment/validation/{imp_uid}")
    @ResponseBody
    public IamportResponse<Payment> validateIamport(@PathVariable String imp_uid) {
        IamportResponse<Payment> payment = iamportClient.paymentByImpUid(imp_uid);
        log.info("결제 요청 응답. 결제 내역 - 주문 번호: {}", payment.getResponse().getMerchantUid());
        return payment;
    }
}
이전 포스팅에서 첨부한 js파일에서 요청하는 순서 대로 설명하면 다음과 같다.
요청과 응답 순서
- "/payment/validation/{imp_uid}" 경로로 요청해 구매자가 구매하려는 상품들의 결제 내역을 반환받는다.
- 결제 내역을 성공적으로 반환 받으면 "/order/payment" 경로로 요청을 보내 결제하려는 상품들을 saveOrder() 메서드로 주문 테이블에 저장하도록 하였다.
- 만약 saveOrder()에서 상품의 재고가 부족해 예외가 발생하면 catch 구문으로 가서 getToken()으로 엑세스 토큰을 발급받고, refundRequest()로 환불을 진행한다.
RefundService
해당 메서드들을 보면 클라이언트 쪽에서 요청하는 코드를 작성하지 않고,
서버 측에서 Java 코드로 iamport API에 요청을 하고 응답 값을 반환하였다.
@Transactional
@Slf4j
@RequiredArgsConstructor
@Service
public class RefundService {
    public void refundRequest(String access_token, String merchant_uid, String reason) throws IOException {
        URL url = new URL("https://api.iamport.kr/payments/cancel");
        HttpsURLConnection conn = (HttpsURLConnection) url.openConnection();

        // 요청 방식을 POST로 설정
        conn.setRequestMethod("POST");

        // 요청의 Content-Type, Accept, Authorization 헤더 설정
        conn.setRequestProperty("Content-type", "application/json");
        conn.setRequestProperty("Accept", "application/json");
        conn.setRequestProperty("Authorization", access_token);

        // 해당 연결을 출력 스트림(요청)으로 사용
        conn.setDoOutput(true);

        // JSON 객체에 해당 API가 필요로하는 데이터 추가.
        JsonObject json = new JsonObject();
        json.addProperty("merchant_uid", merchant_uid);
        json.addProperty("reason", reason);

        // 출력 스트림으로 해당 conn에 요청
        BufferedWriter bw = new BufferedWriter(new OutputStreamWriter(conn.getOutputStream()));
        bw.write(json.toString());
        bw.flush();
        bw.close();

        // 입력 스트림으로 conn 요청에 대한 응답 반환
        BufferedReader br = new BufferedReader(new InputStreamReader(conn.getInputStream()));
        br.close();
        conn.disconnect();

        log.info("결제 취소 완료 : 주문 번호 {}", merchant_uid);
    }

    public String getToken(String apiKey, String secretKey) throws IOException {
        URL url = new URL("https://api.iamport.kr/users/getToken");
        HttpsURLConnection conn = (HttpsURLConnection) url.openConnection();

        // 요청 방식을 POST로 설정
        conn.setRequestMethod("POST");

        // 요청의 Content-Type과 Accept 헤더 설정
        conn.setRequestProperty("Content-Type", "application/json");
        conn.setRequestProperty("Accept", "application/json");

        // 해당 연결을 출력 스트림(요청)으로 사용
        conn.setDoOutput(true);

        // JSON 객체에 해당 API가 필요로하는 데이터 추가.
        JsonObject json = new JsonObject();
        json.addProperty("imp_key", apiKey);
        json.addProperty("imp_secret", secretKey);

        // 출력 스트림으로 해당 conn에 요청
        BufferedWriter bw = new BufferedWriter(new OutputStreamWriter(conn.getOutputStream()));
        bw.write(json.toString()); // json 객체를 문자열 형태로 HTTP 요청 본문에 추가
        bw.flush(); // BufferedWriter 비우기
        bw.close(); // BufferedWriter 종료

        // 입력 스트림으로 conn 요청에 대한 응답 반환
        BufferedReader br = new BufferedReader(new InputStreamReader(conn.getInputStream()));
        Gson gson = new Gson(); // 응답 데이터를 자바 객체로 변환
        String response = gson.fromJson(br.readLine(), Map.class).get("response").toString();
        String accessToken = gson.fromJson(response, Map.class).get("access_token").toString();
        br.close(); // BufferedReader 종료

        conn.disconnect(); // 연결 종료

        log.info("Iamport 엑세스 토큰 발급 성공 : {}", accessToken);
        return accessToken;
    }
}
getToken() 메서드
Iamport의 API를 사용하기 위해서는 먼저 access_token을 발급받아야한다.
해당 API가 필요로하는 값들을 json 객체에 담아 요청하여 응답으로 반환된 데이터에서 우리가 필요로 하는 access_token을 꺼내 반환하도록 하였다.
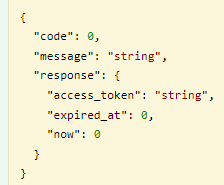
refundRequest() 메서드
getToken()으로 발급받은 access_token을 사용하여 결제 취소를 요청한다.
필요로 하는 파라미터에 대한 설명들은 아래의 공식문서 목차에서 확인할 수 있다.
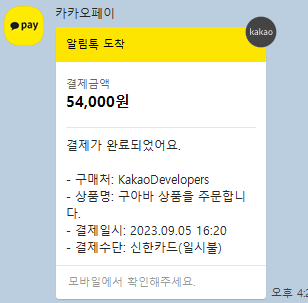
주의할점으로 처음에는 요청에 대한 응답이 성공적으로 반환되었지만 결제 완료 메세지는 오지만, 결제 취소 알림 메세지가 오질않았다.
이유를 알아보니 해당 URL의 요청에 대한 응답 코드가 200번이더라도 응답 Body의 code 키 값이 0이 아닐 경우에는 환불에 실패한 것이라고 한다.
이 경우에 원인을 찾기 위해서는 body의 message를 통해 확인할 수 있다.
이 내용은 refundRequest() 메서드에 아래의 코드를 추가해 로그를 통해 확인해볼 수 있다.
String responseJson = new BufferedReader(new InputStreamReader(conn.getInputStream()))
        .lines()
        .collect(Collectors.joining("\n"));

System.out.println("응답 본문: " + responseJson);

JsonObject jsonResponse = JsonParser.parseString(responseJson).getAsJsonObject();
String resultCode = jsonResponse.get("code").getAsString();
String resultMessage = jsonResponse.get("message").getAsString();

System.out.println("결과 코드 = " + resultCode);
System.out.println("결과 메시지 = " + resultMessage);
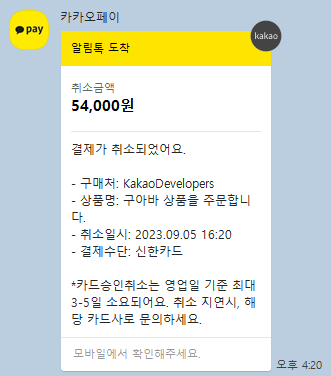
이제 결제 도중에 예외가 발생할 경우 바로 결제 취소가 되는 것을 확인할 수 있다.
결제취소 기능 구현을 위한 공식문서
추가로 이 API들을 호출하는데 도움이 된 공식문서를 아래 첨부한다.
- Access Token 발급 요청하기 - https://portone.gitbook.io/docs/api/rest-api-access-token
- 결제취소 API 파라미터 설명 - https://portone.gitbook.io/docs/api/api-1/api
- 결제취소 요청하기 - https://portone.gitbook.io/docs/auth/guide-2
'◼ JAVA > Spring' 카테고리의 다른 글
| [Spring] 자체 서비스 회원과 소셜 로그인 회원 통합 관리 방법 (0) | 2023.09.13 |
|---|---|
| [Spring + Redis] Redis cache를 적용해 조회 성능 개선 방법 (0) | 2023.09.11 |
| [Spring] 아임포트(import)로 결제 기능 구현하기 (클라이언트 + 서버 코드 포함) (6) | 2023.09.01 |
| [Spring] 로그인 어노테이션으로 세션 정보가져오기 (Argument Resolver 활용) (0) | 2023.08.31 |
| [Spring] Cookie(쿠키)를 활용한 최근 본 상품 기능 구현 (Session과 비교) (0) | 2023.08.30 |