

@ModelAttribute와 @RequestBody 모두 HTTP 요청 파라미터를 객체에 매핑하는 데 사용되는 어노테이션입니다.
api 개발을 하다가 이 두 개념에 대해 헷갈려서 확실히 정리하고 넘어가고자 포스팅하려 한다.
@ModelAttribute
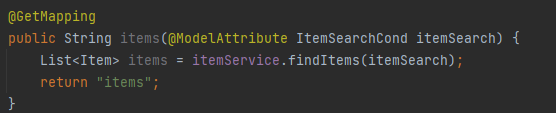
@ModelAttribute는 요청 파라미터의 이름과 일치하는 객체의 필드에 요청 파라미터를 매핑한다.
쉽게 말해 폼 데이터를 객체에 매핑할 때 주로 사용하는 것이다.
아래 컨트롤러에 있는 코드를 통해 예시들을 보고 쉽게 이해해보자.
requestDto
위 ItemSearchCond 객체를 살펴보면 다음과 같다.
@Getter
@NoArgsConstructor
public class ItemSearchCond {

    private String itemName;
    private Integer maxPrice;

    public ItemSearchCond(String itemName, Integer maxPrice) {
        this.itemName = itemName;
        this.maxPrice = maxPrice;
    }
}
items.html
그 다음으로 ItemSearchCond 객체를 매핑할 때 사용하는 폼 데이터의 일부를 보면 다음과 같다. (Thymeleaf 사용)
<!DOCTYPE HTML>
<html xmlns:th="http://www.thymeleaf.org">
<head>
    <meta charset="utf-8">
    <link th:href="@{/css/bootstrap.min.css}"
          href="css/bootstrap.min.css" rel="stylesheet">
</head>
<body>

<div class="container" style="max-width: 600px">
    <div class="py-5 text-center">
        <h2>상품 목록</h2>
    </div>

    <form th:object="${itemSearch}" method="get" class="form-inline">
    <div class="row">
        <div class="col">
            <input type="text" th:field="*{itemName}" class="form-control" placeholder="상품명"/>
        </div>
        <div class="col">
            <input type="text" th:field="*{maxPrice}" class="form-control" placeholder="가격제한"/>
        </div>
        <div class="col">
            <button type="submit" class="btn btn-secondary mb-2">검색</button>
        </div>
        <div class="col">
        </div>
        <div class="col">
            <div class="col">
                <button class="btn btn-primary float-end"
                        onclick="location.href='addForm.html'"
                        th:onclick="|location.href='@{/items/add}'|"
                        type="button">상품 등록
                </button>
            </div>
        </div>
    </div>
    </form>
    ...
ItemSearchCond의 필드와 일치하는 값으로 form을 통해 요청 파라미터를 받아 매핑하는 것을 볼 수 있다.
위와 같은 방법으로 @ModelAttribute는 폼 데이터를 객체에 매핑할 때 주로 사용된다.
@RequestBody
@RequestBody는 요청 본문(Body)의 콘텐츠를 객체에 매핑한다.
요청 본문의 콘텐츠가 JSON 또는 XML과 같은 형식으로 전송되는 경우에 사용한다.
즉, API 통신에 주로 사용한다.
아래 API 컨트롤러에 있는 코드를 통해 예시들을 보고 쉽게 이해해보자.
@RequiredArgsConstructor
@RestController
public class PostsApiController {

    private final PostsService postsService;

    @PostMapping("/api/v1/posts")
    public Posts save(@Validated @RequestBody PostsSaveRequestDto requestDto) {
        return postsService.save(requestDto);
    }
    ...
}
PostsSaveRequestDto
위 PostsSaveRequestDto 객체를 살펴보면 다음과 같다.
@Getter
@NoArgsConstructor
public class PostsSaveRequestDto {

    @NotEmpty
    private String title;
    private String content;
    private String author;

    @Builder
    public PostsSaveRequestDto(String title, String content, String author) {
        this.title = title;
        this.content = content;
        this.author = author;
    }

    public Posts toEntity() {
        return Posts.builder()
                .title(title)
                .content(content)
                .author(author)
                .build();
    }
}
API 동작방식
그 다음으로 이 객체로 요청 데이터(JSON 또는 XML)이 넘어와야하는데 어떤식으로 넘어오는지 API 흐름을 보면 다음과 같다.
1. 먼저 @Controller가 붙은 컨트롤러에서 url을 통해 요청을 받는다.
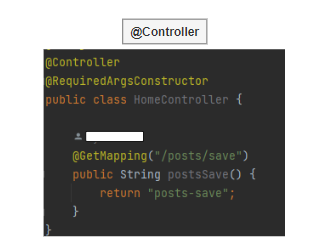
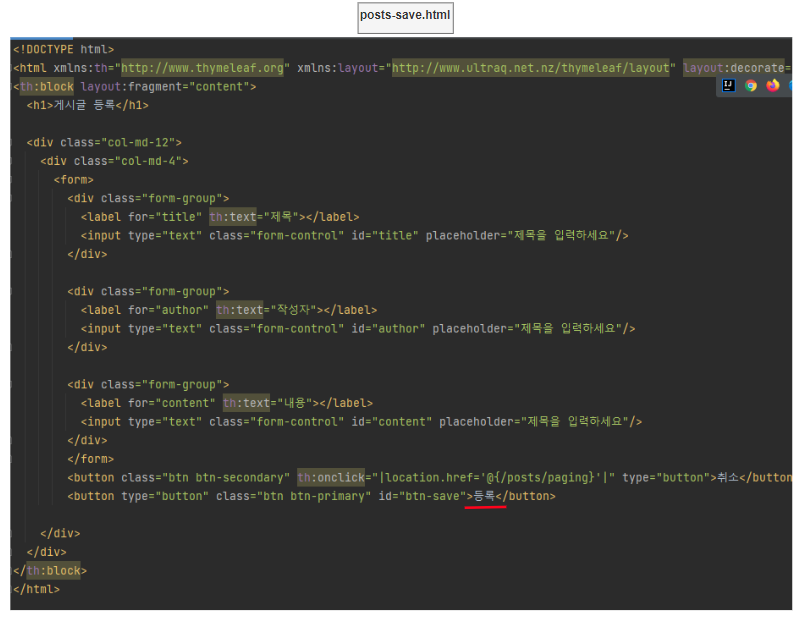
2. 그리고 해당 url로 접속시 보여주는 posts-save.html 페이지를 확인한다.
해당 페이지를 확인하면 다음과 같이 폼을 입력하는 화면이 나오고 "등록"이라는 버튼이 보일 것이다.
이 등록 버튼을 클릭하면 다음 3번으로 연결된다.
3. 등록 클릭 시 자바스크립트 파일의 "btn-save" 함수를 호출
위 함수가 호출되면 다음과 같은 데이터를 POST 요청으로 @Restcontroller의 save함수 @PostMapping 주소인 "/api/v1/posts"로 JSON 타입으로 전달한다.
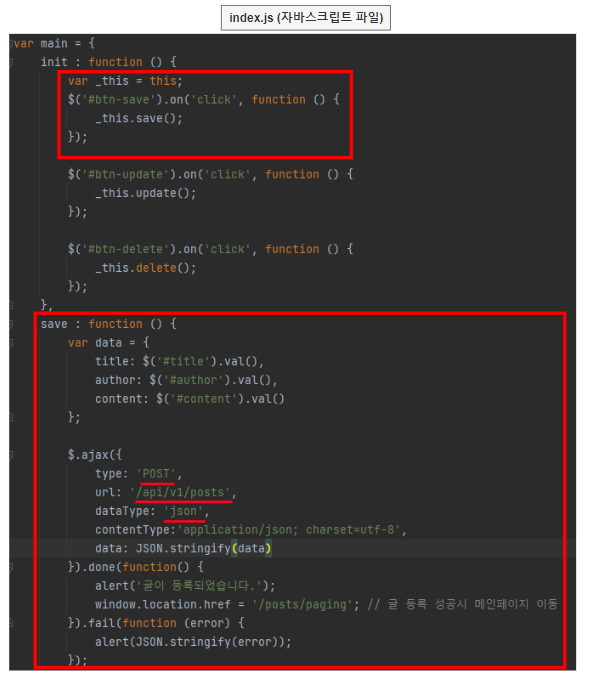
이런식으로 ajax를 통해 넘어온 JSON 또는 XML과 같은 형식의 데이터를 전달받아 객체에 매핑하는 것이다.
정리
위 내용들을 정말 간단하게 정리하면 다음과 같다.
@ModelAttribute
폼에서 넘어온 데이터를 처리
@RequestBody
ajax를 통해 넘어온 JSON 또는 XML과 같은 형식의 데이터를 처리 (API 방식)
'◼ JAVA > Spring' 카테고리의 다른 글
| [Spring] GET요청으로 url 쿼리 파라미터에 포함된 JSON 데이터 사용하기 (0) | 2023.08.30 |
|---|---|
| @ModelAttribute가 객체에 바인딩하는 과정 및 방법 (0) | 2023.07.29 |
| [Spring/JPA] OSIV 전략이란? 언제 사용해야 할까? (0) | 2023.06.19 |
| [Spirng/JPA] Dto와 Entity를 분리해서 사용하는 이유 (0) | 2023.06.16 |
| [Spring] @Controller와 @RestController의 차이 및 구분 (0) | 2023.06.16 |